The first product photo I ever paid for cost me more than the product inside the box.
Back then I had a handful of listings, a phone, a kitchen counter, and a photographer's quote for one afternoon and eight images. The number on it was higher than a month of my rent at the time. For a small store still testing whether anyone wanted the thing I was selling, that math was a non-starter. So my products went live with dim, gray phone shots taken on that counter. They converted about as well as dim, gray phone shots do. I kept telling myself the product would speak for itself. It did not.
Then AI image tools got good enough to depend on. Now I can take a plain phone snap of a product and turn it into a clean, studio-style image in the time it takes to make a coffee.
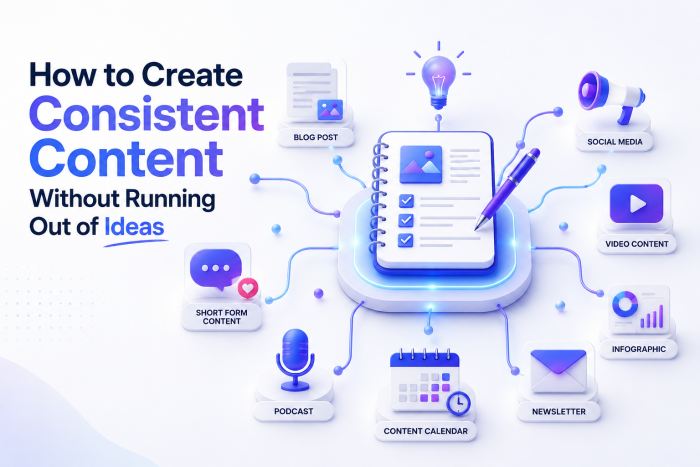
This guide is the exact process I use, written for anyone who has a product and a phone but no studio and no budget for a photographer. I will cover what these images are, which tools to open, the full step-by-step workflow, the prompts I copy and paste, and the single rule that keeps a listing from getting pulled. No theory. By the end you will be ready to make your first one tonight.
What are AI product photos?
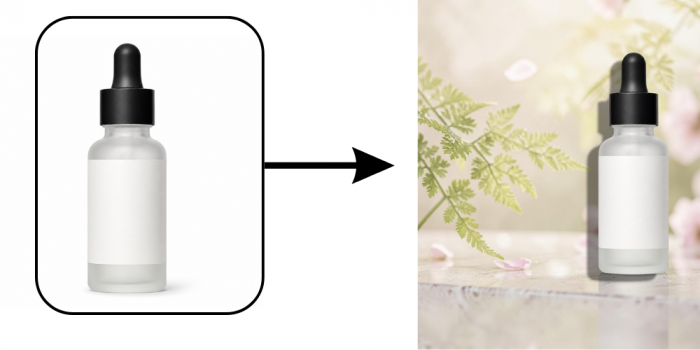
AI product photos are product images created or edited by artificial intelligence instead of a full camera shoot. You hand a tool a plain photo or a short text description, and it returns a polished version: a clean background, controlled lighting, a styled scene, and the finish a studio would give. Your real product stays at the center, and the software builds the world around it.
There are two ways this plays out in practice.
- Enhancement. You start with a real photo of your product, and the AI cleans it up, drops the background, fixes the lighting, then sets it on a nicer surface.
- Generation. You describe a scene in words, and the AI builds the whole image around your product, or around a 3D model of it.
In a real workflow the two blur together, and that is fine.
These images end up everywhere a shopper looks: your marketplace listings, your paid ads, the Instagram grid, your landing pages, the header in an abandoned-cart email. The same starting photo can feed all of them, which is the first hint at why this saves so much money. That money is the next thing worth talking about.
Why bother using AI for product photos?
Start with the part that changed my business: money. A traditional shoot is priced per session or per product, and depending on the item and the studio, that runs anywhere from a couple hundred dollars to several thousand for one session. AI images land somewhere between roughly ten cents and two dollars each once you are on a paid plan, and most tools hand you a free batch every month before you pay a thing.
The gap is not small.
| Traditional shoot | AI workflow | |
|---|---|---|
| Cost per image | $25 to $200+ each | Free to about $2 each |
| First image ready | 2 to 4 weeks | Minutes |
| New background later | Reshoot, or a reshoot fee | Re-prompt in seconds |
| Best for | Luxury and texture-heavy hero shots | Volume, variations, scenes, ad tests |
Beyond the price, here is what shows up day to day.
- No studio, no gear. A windowsill with daylight and a phone are enough to begin.
- Speed. A fresh image in minutes instead of the two-to-four-week shoot-and-edit cycle a studio needs.
- Cheap testing. Generate five background versions of the same product and let your ad numbers pick the winner.
- One consistent look. Reuse the same lighting and style across every product so the store reads as one brand, not five different sellers.
AI is not the right tool for every shot, and there is a line where using it the wrong way will get a listing suppressed. I draw that line clearly in the marketplace-rules section further down, so hold that thought for now.
The tools worth opening
You do not need a stack of subscriptions. You need one tool you trust and, in time, a specialist or two. Here are the names I would start with, grouped by the job they do.
Pricing in this space shifts month to month, so treat the numbers below as a mid-2026 snapshot and check each tool's current page before you pay.
| Tool | Best for | Free option | Paid (from) |
|---|---|---|---|
| Pebblely | Beginners; theme-based background scenes | 40 images a month, no card | About $19 a month |
| Photoroom | All-round editing and background removal, works on mobile | Free plan, export limits apply | From roughly $10 a month |
| remove.bg | Fast, single-purpose background removal | Free low-resolution downloads | Credit packs, about $0.20 an image |
| Claid.ai | Larger catalogs; keeps logos and product shape intact | Limited trial | Catalog plans |
| Flair.ai | Hands-on scene building on a drag-and-drop canvas | Limited free use | Subscription |
You can also reach for a general image generator like ChatGPT's image tool, Google's Gemini image feature, Midjourney, or Freepik to build backgrounds and scenes. They produce gorgeous environments. The catch is that they treat your product as raw material to reinvent: labels warp, colors drift, logos blur, and the bottle you sell turns into a bottle you do not. Use them for the world around the product, never for the product itself.
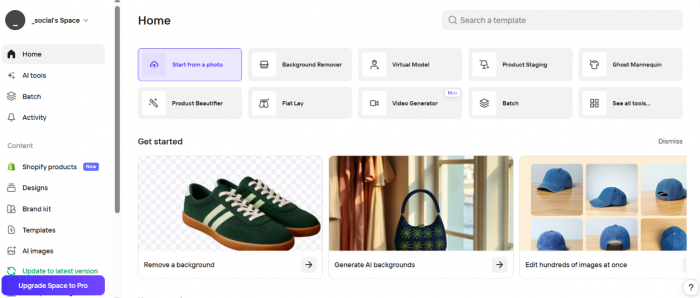
My advice is simple. Pick one all-rounder and learn it well. I run almost everything through a single tool and only reach for a second when I hit a wall, because a repeatable process beats a bigger toolbox every time. In the walkthrough below I stay inside one free tool from start to finish, so you can follow along without spending anything.
The step-by-step process
This is the part that does the real work, and it is the same loop every time. Five minutes of practice and it sticks.
Step 1: Start with a clean product shot
Photograph the real product on a plain surface. A sheet of white paper taped to a wall, a windowsill with daytime light, a steady hand on your phone, and nothing else. The cleaner the input, the less the AI has to guess, and the less it is tempted to invent. A 3D model works just as well if you have one. The one thing the AI must never make up is the product, so always give it a true photo to build from. This is where the accuracy rule I flagged a moment ago begins.
Step 2: Upload and isolate
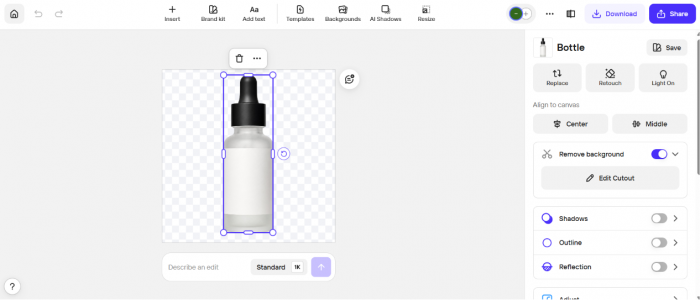
Open your tool and bring the photo in. For this walkthrough I am on a free plan with no card attached. If the background is messy, remove it first so you are left with a clean cut-out of the product on white or transparent. Most all-round tools handle this in one click.
Step 3: Write a prompt that describes the scene, not the product
Here is the mistake almost everyone makes at the start: they describe the product, as in a blue water bottle. The tool can already see your product. What it needs from you is the world around it, so describe the surface, the light, the mood, and the camera feel.
A prompt I would use here: studio product photo of a matte bottle on pale concrete, soft window light, shallow depth of field.
A full set of copy-and-paste prompts is in the next section.
Step 4: Generate a batch, not a single image
Never judge a tool on its first result. Generate four to eight at once, then change one thing at a time: warmer light, a different surface, a tighter crop, a new angle. The keeper usually shows up in the third or fourth batch, not the opening attempt.

Step 5: Refine the closest one
Pick the version nearest to right and fix it from there. Nudge the lighting, swap the background, adjust the angle, or re-run the prompt with one small edit. Watch the product edges and the label, because this is exactly where AI starts to lie. If the label has warped or the color has drifted off your real product, throw it out and regenerate. A pretty picture of the wrong product is worthless.
Step 6: Upscale and export to spec
Marketplaces want large, sharp files. Upscale the final image, sharpen it, then export it as a JPEG or PNG in the sRGB color space. Aim high on resolution, because the marketplace section below explains why 2000 pixels is the number to beat.
That is the whole loop: shoot, isolate, prompt, batch, refine, upscale.
After a week of doing it, I am down to about three minutes an image.
Prompts you can copy
This is the section people bookmark, so I am giving you prompts that work as written. Swap in your own product and surface and keep the structure intact. You are most of the way there.
| Product | Prompt to copy |
|---|---|
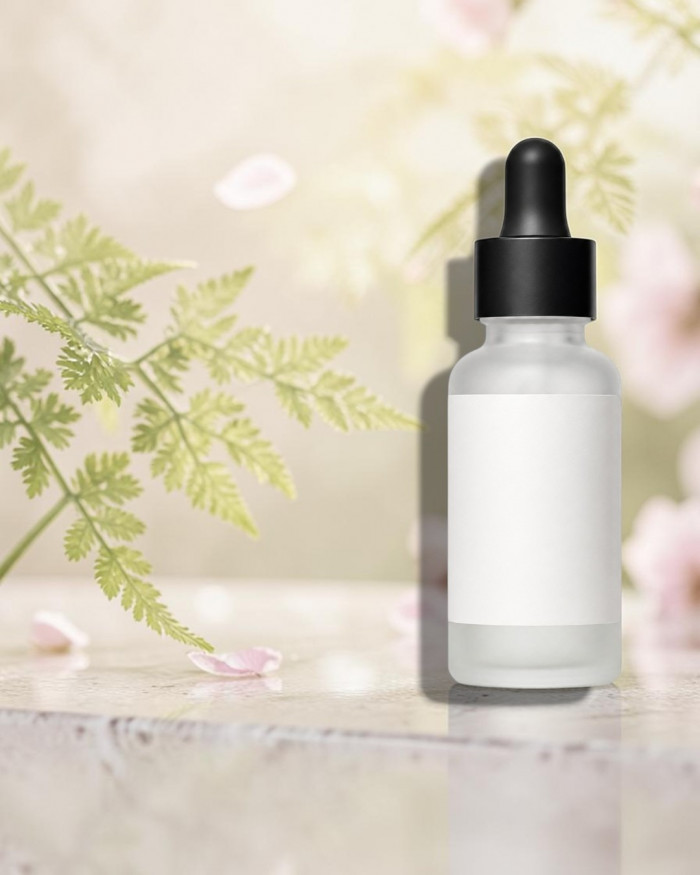
| Skincare bottle | minimalist product photo of a skincare bottle on a wet stone slab, soft diffused light, pale background, faint reflection |
| Sneakers | ecommerce product shot of white sneakers on cracked city pavement, late afternoon sun, low angle, crisp shadow |
| Jewelry | macro product photo of a gold ring resting on folded silk, warm key light, dark background, fine detail |
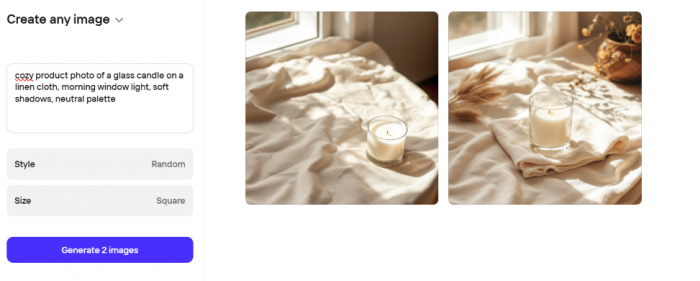
| Candle | cozy product photo of a glass candle on a linen cloth, morning window light, soft shadows, neutral palette |
| Coffee bag | studio product photo of a matte coffee pouch beside scattered beans, warm overhead light, wooden table |
| Earbuds | clean product photo of wireless earbuds on brushed aluminum, cool studio light, reflective surface, minimal scene |
Notice the pattern. Each one moves from shot type to product, then surface, then light, then a small mood or camera note. The product description stays thin on purpose, because, as I said in Step 3 above, the tool is already looking at your photo.
Keep the ones that land in a notes file. That file slowly turns into your studio.
Mistakes that cost me time
I made most of these in my first month, so you do not have to.
- Overstuffed prompts. Ten adjectives just fight each other. Two strong ones beat ten weak ones.
- Lighting that ignores physics. A bottle lit from two impossible directions reads as fake the instant a shopper sees it.
- Ignoring your brand. If your store feels warm and earthy, a cold blue studio shot looks borrowed from someone else.
- Letting the AI redraw the product. Warped labels, shifted colors, invented textures, fonts that melt. This is the costly one, and it runs straight into the next section.
- Skipping the upscale. A soft 800-pixel image gets rejected at upload, or it kills the zoom that helps people buy.
The one rule that keeps your listings alive
Everything above is fun until a listing gets suppressed. The rule that prevents it is short: the image has to match the product the buyer receives.
Amazon spelled this out for 2026. AI-enhanced and fully AI-generated images are allowed, as long as the result is an accurate representation of the physical product. Background removal, lighting and color correction, background swaps, and AI lifestyle scenes in your secondary slots are all permitted. Infographic overlays sit on the allowed side as well.
What gets a listing pulled is different: inventing features the product does not have, faking before-and-after images, showing a color the buyer will never receive, or misrepresenting the size and materials.
The bigger shift in 2026 is enforcement, not new rules. Amazon now runs automated checks that can flag a synthetic main image, and in some categories an obviously AI-generated hero shot gets suppressed at upload. Some generators even bake in an invisible watermark that detection software reads, so it looks fine to me is no longer the safety net it once was.
Here is how I stay on the safe side.
- Keep the main image honest and photographic. Pure white background, the product filling most of the frame, a square crop, and no text or logo sitting on top.
- Put AI lifestyle scenes in the secondary slots, never the main one.
- Never change the real color, shape, finish, or size of what ships to the customer.
- Export at 2000 pixels or larger, so the zoom feature works and the file clears upload.
Etsy, eBay, Shopify, and Walmart each have their own image rules, but the accuracy principle is identical everywhere, and so is the cost of breaking it: returns, one-star reviews, refund requests, and dead listings. There is also a point where I close the AI tools entirely. For a hero shot of a luxury item, or any product where texture and material drive the sale, a real photograph still wins. The sellers I respect run a hybrid: a few honest base photos of the real product, then AI for the backgrounds, the scale shots, the seasonal swaps, and the ad variations.
Where these images go to work
A clean image is only worth the effort once it sits in front of buyers. Here is where mine go.
- Marketplace listings. A true-white hero image, then the AI lifestyle and detail shots filling your secondary slots, each one sized to its marketplace.
- Your own store. A hero scene at the top, supporting shots down the page, then a product grid that all shares one look.
- Paid ads. This is where cheap iteration pays off. Generate eight background variants of one product, run them as a split test, then cut the losers fast.
- Social. Flat-lays and lifestyle scenes that match your brand mood, so the grid feels designed rather than thrown together.
- Email and landing pages. A scene image for the header, tight detail crops down the body, all reused so nothing needs reshooting.
Your first image, tonight
Here is the smallest possible first step. Tonight, stand your best-selling product on a windowsill in daylight, take one clean phone photo, then run it through a free tool using any prompt from the list above. If that single image beats what is on your listing right now, you have your answer, and tomorrow you do the next ten.